
Thank you for purchasing! The links to your audio files and written guide will be emailed to you within a few minutes. You can download them from there.
We recommend bookmarking this page in case you have any problems with your download. This will allow you to troubleshoot.
To extract the .zip file on a PC:
Locate the zipped folder that you want to unzip (extract) files or folders from. Do one of the following:
- To unzip a single file or folder, open the zipped folder, then drag the file or folder from the zipped folder to a new location.
- To unzip all the contents of the zipped folder, press and hold (or right-click) the folder, select Extract All, and then follow the instructions.
To extract the .zip file on a Mac:
- Unzipping a file or folder couldn’t be easier. Double-click the zip file and the file or folder will be decompressed into the same folder the compressed file is in.
- If the item you are decompressing contains a single file, the new decompressed item will have the same name as the original file.
- If a file with the same name is already present in the current folder, the decompressed file will have a number appended to its name.
For Files That Contains Multiple Items
- When a zip file contains multiple items, the unzipped files will be stored in a folder that has the same name as the zip file. For example, if you unzip a file called Archive.zip, the files will be placed in a folder called Archive. This folder will be placed in the same folder as the Archive.zip file. If the folder already contains a folder called Archive, a number will be appended to the new folder, such as Archive 2.
iTunes for Windows: Import music and video already on your computer
If you have audio or video files on your computer, you can import them into iTunes so they appear in your iTunes library.
To add media from Audible Manager to your iPod, iPhone, or iPad, you need to first import it into iTunes.
Add items from your computer to your iTunes library
Do either of the following:
- Drag a file or folder from the desktop to the iTunes window.
If you add a folder, all the files it contains are added to your library.
- In iTunes, choose File > Add to Libraryor Add Folder to Library, locate a file or folder, then click Open.
By default, adding items to your iTunes library creates a reference to the file’s current location; the original file remains in the current location unless you select “Copy files to the iTunes Media folder when adding to library.”
For information about copying files to the iTunes folder instead of creating references to them, see Change where your iTunes files are stored. If the file is an unprotected WMA file and you have Windows Media Player Series 9 or later installed, iTunes makes a copy of the file and adds it to your iTunes library. The original WMA file remains unchanged. You can’t add protected WMA files or protected WMV files to iTunes.
How to transfer files to your iPhone using Wi-Fi
Sync your iPhone, iPad, or iPod touch with iTunes using Wi-Fi
Use iTunes to sync information on your iPhone, iPad, or iPod touch with your computer over Wi-Fi.
This article is for syncing with iTunes using Wi-Fi. You can also sync your iPhone, iPad, or iPod touch with iTunes using USB.
Syncing allows you to share information between devices. For example, if you buy a movie on your computer, you can sync to add the movie to your iPhone.
When you sync, iTunes determines whether your iOS device or your computer has the most recent information. Then, you can choose what you want to sync.
If you use iCloud or other services like Apple Music to keep your content up to date across all of your devices, syncing through iTunes might be disabled.
Set iTunes to sync your iOS device over Wi-Fi
- Open iTunes. Make sure that you have the latest version.
- Use the USB cable that came with your iOS device to connect it to your computer.
- In iTunes, find and then click your iOS device.
- On the Summary tab, select “Sync with this [device] over Wi-Fi.”

- Click Apply, then disconnect the USB cable.
- Choose the items that you want to sync, then click sync.
When the computer and the iOS device are on the same Wi-Fi network, the iOS device appears in iTunes. The iOS device syncs automatically whenever it charges and iTunes is open on the computer. Learn more about what you can sync and how to sync specific items.
You can also sync your iOS device using a USB cable.
How to transfer files to your iPhone manually
Manually manage content on your iPhone, iPad, or iPod touch using iTunes
You can manually add specific content from your computer to your iOS device.
With iTunes, you can manage the content on your iPhone, iPad, or iPod by manually syncing specific items to your device.
If you have iCloud Music Library turned on, you can’t manually manage music, but you can still manage videos using the steps below.
Manually add items from iTunes
- Connect your device to your computer.
- Open iTunes. Make sure that you have the latest version.
- Choose the content that you want to add to your device from your iTunes library.

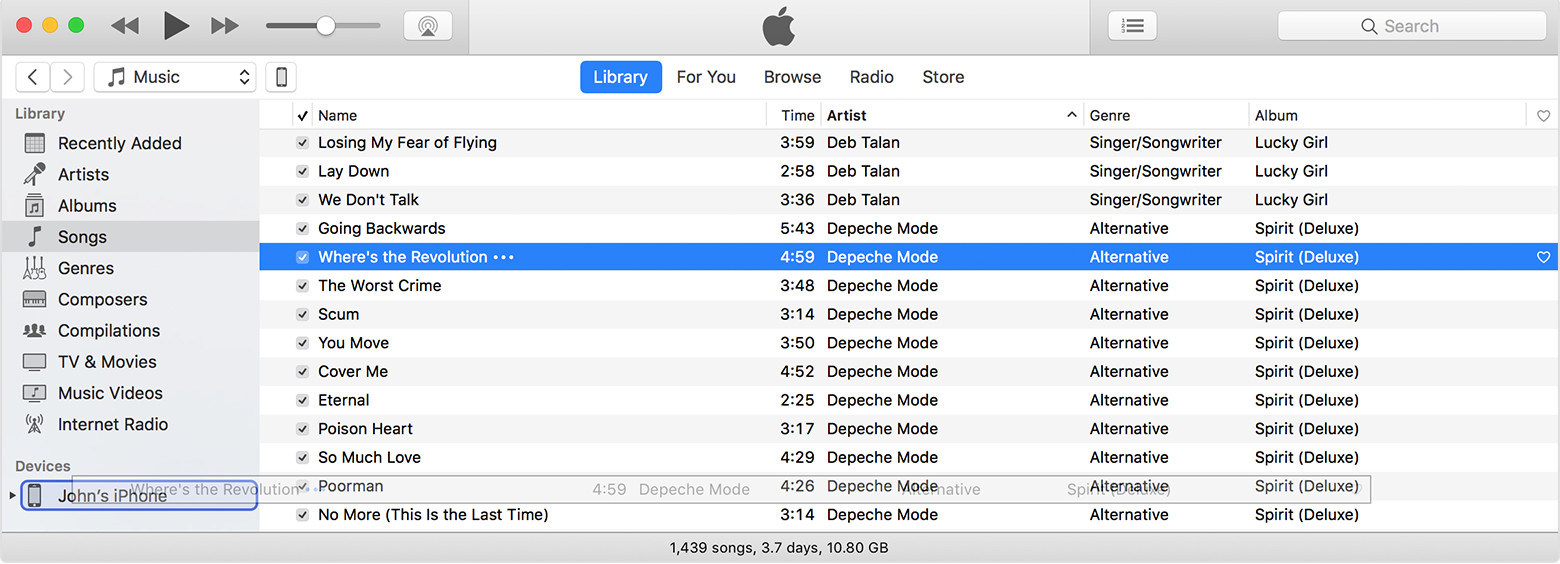
- Look in the left sidebar for your device, then drag the content to your iPhone, iPad, or iPod.
If you’re using an iPhone, you can add music or videos only from a single iTunes Library.
If you’re using an iPad or iPod, you can add music from multiple iTunes Libraries, but videos from only one iTunes Library.

If you can’t manually add or remove content from your device
Check to make sure that the “Manually manage music and videos” option is turned on:
- Connect your device to your computer.
- Open iTunes. Make sure that you have the latest version.
- Locate and click on your device.

- In the left sidebar, click Summary.
- Scroll to the Options section.
- Click the box next to “Manually manage music and videos.”
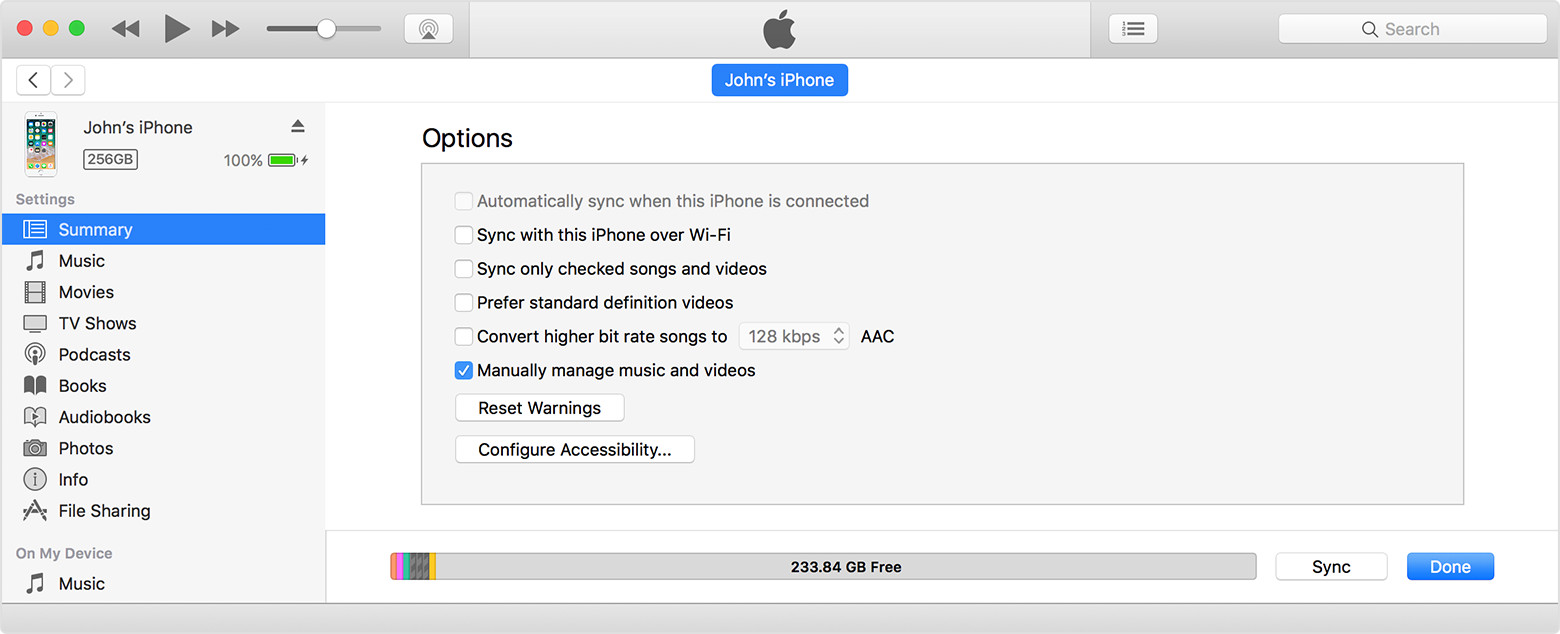
- Click Apply.
You might see a message that your device is synced with another library. This means that you’ve used a different computer to sync your device in the past, and iTunes can’t sync without first erasing and replacing all iTunes content on your device.
Manually add items from your computer
If you have media on your computer that you can’t redownload from the App Store or iTunes Store directly on your iOS device, such as custom ringtones or iOS apps, you can drag and drop the media from your computer to your iOS device using iTunes.
- Connect your device to your computer.
- Open iTunes. Make sure that you have the latest version.
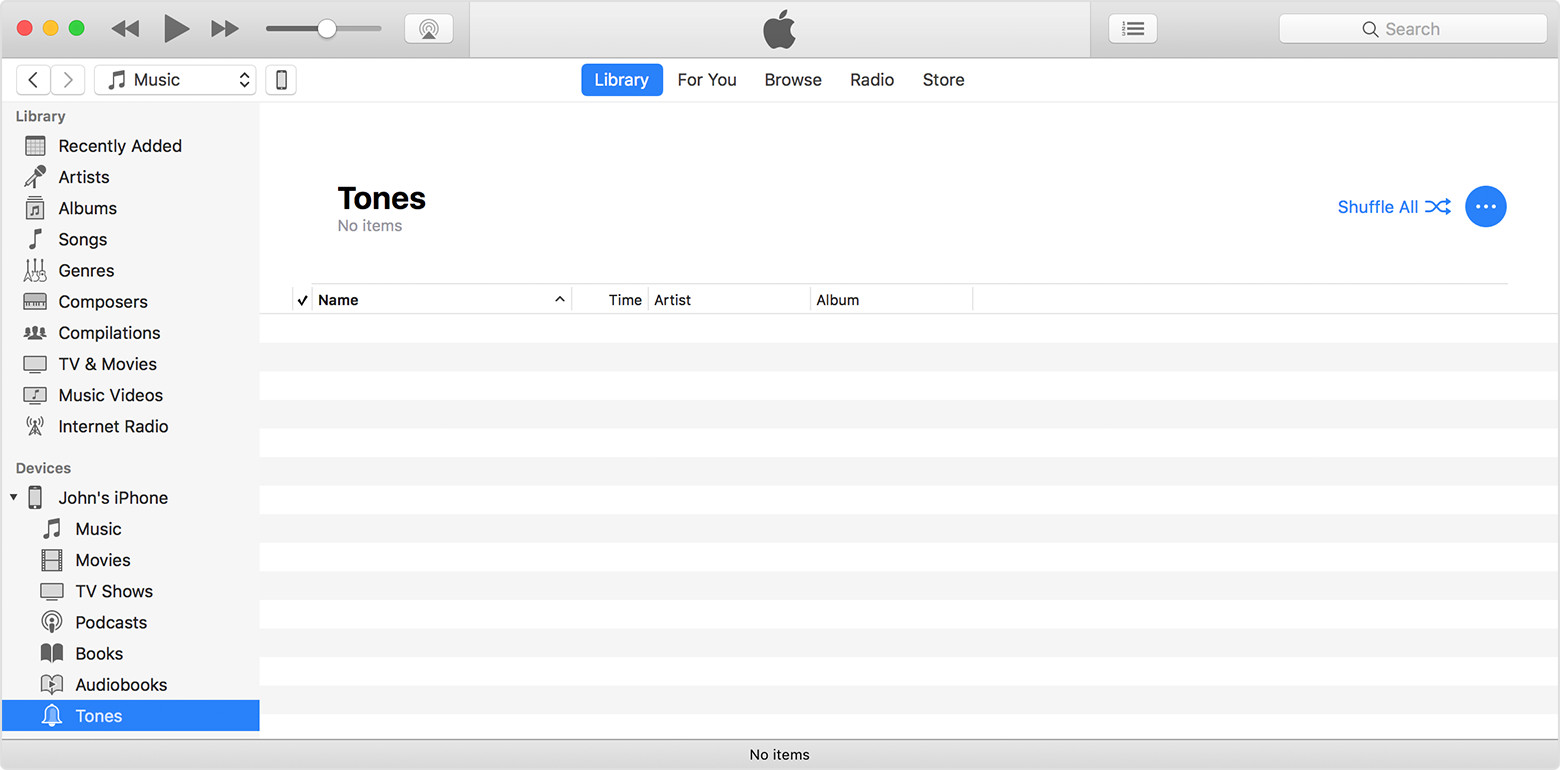
- On your computer, find the item you want to add to your device. If you’re looking for Apps, Tones, or Books (for Windows) that previously appeared in your iTunes library, you can find them in your iTunes media folder.
- Select the item that you want to add to your device and copy it. (You can use a keyboard shortcut.)
- Return to iTunes and go to the Library tab of Music.
- Click on your device in the left sidebar, then click the name of the item that you’re adding. For example, click Tones if you’re adding a ringtone.
- Paste your item. (You can use a keyboard shortcut.)
How to transfer files and music to Android
NEWER PHONES:
- Consider using cloud storage for transfer, example: Google Drive, Dropbox, etc)
- Or, you can try downloading this Android File Transfer HERE
OLDER PHONES:
With older Android phones, you may still be able to transfer files via this USB method:
- Connect your Android phone to your computer using the micro USB to USB cable.
- If you are using a PC, you will see an installation bubble pop up in the bottom right of your screen. Wait for the computer to successfully complete installation.
- The critical step: On your Android phone, pull down the notification window (aka ‘window shade’) and tap USB connected.
- A notification window will appear. Tap Mount. Your phone will enter USB storage mode.
- Find the removable storage drive. On a PC, navigate to My Computer and look for a new removable storage drive. On a Mac, the drive will appear on your desktop.
- Drag-and-drop the desired file(s) to the drive.
- In your phone’s notification window, tap Turn off USB storage.
- Unplug your phone and you’re all set.